Our Step-by-Step Guide On How To Lay Floor Screed
Laying screed over underfloor heating is a process where the details really matter. Proper preparation, secure pipework, and correct application all contribute to how well the floor screed system performs once in use.
In this guide, we walk through each stage of laying screed over underfloor heating, explaining the process clearly and practically from start to finish.
Step 1: Make Sure The Building Is Watertight
Before getting stuck into the installation process, our experts must first ensure that the building is weather-tight. The roof and all of the external doors and window openings must be fitted with their final fixtures or a weather-proof fixing, in order to ensure the building is completely sealed.
Step 2: Exposed Edges
Temporary frames are installed at door openings and any changes in floor level to keep the screed contained during pouring.
This helps control where the screed flows, maintains the correct finished floor height, and ensures clean, accurate edges once the screed has set. These steps are important for effective floor screed preparation and installation.
Step 3: Installing A Membrane

Once we are done preparing the floor for screeding, a separating membrane is laid over the floor insulation or concrete substrate. This depends on the type of build. The membrane helps control the screed and ensures it performs properly once installed.
During installation, a few key details need to be checked:
• Membrane joints are overlapped by at least 100mm and taped along the full length using 50mm tape.
• All DPM joins are securely sealed to prevent movement or leakage.
• Any creases are gently smoothed out, taking care not to puncture the membrane
• The screed must not come into direct contact with foil-faced insulation.
• Heating pipes are securely fixed in place before screeding begins.
• An 8–10mm isolation strip is fitted at wall–floor junctions and around stairs, columns, and pipework to allow for natural movement.
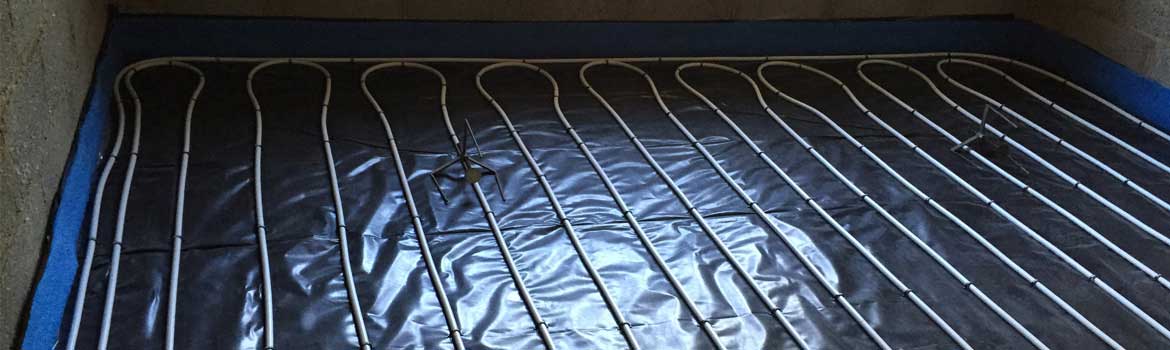
Step 4: Underfloor Heating
Once the membrane is in place, the underfloor heating pipes or cables are securely fixed using high-quality clips pinned through the membrane. This keeps the system stable and correctly positioned before screeding begins.
Before the screed is poured, all warm water pipes are filled, which helps prevent the pipes from lifting or floating during installation.
A few important points to note:
• Flowing screeds offer high flexural strength, allowing for thinner applications than traditional screeds.
• Piped underfloor heating systems are typically laid with a screed depth of around 50mm.
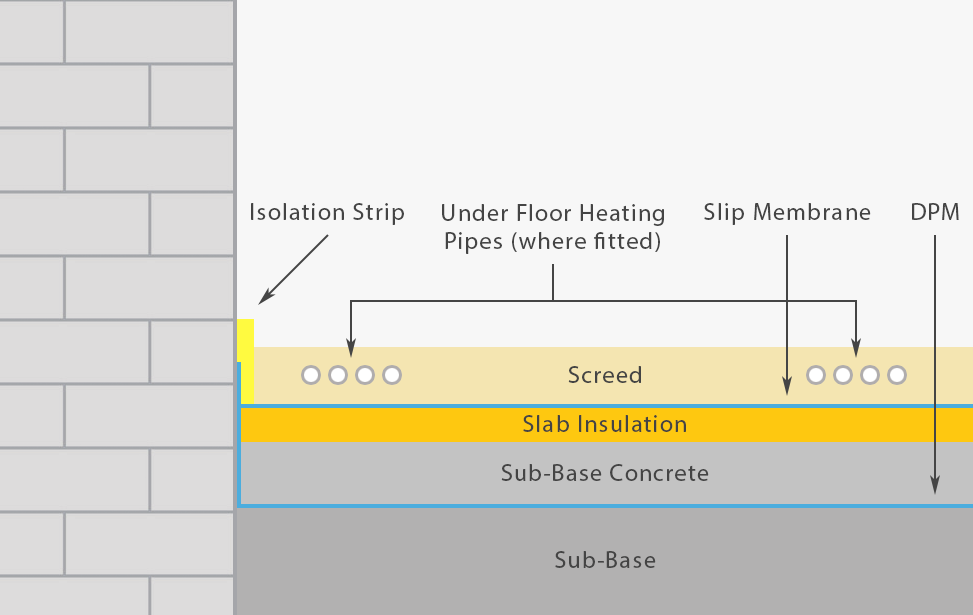
Cross-section diagram of
floor screeding
A Floor with underfloor heating
ready for flow screeding
Why Flow Screeding Services?
At Flow Screeding Services, our team combines technical expertise with a structured, reliable approach to deliver high-quality floor screeding on every project.
We carry out thorough pre-installation checks, arrive fully prepared on the day, and use precise methods – including laser levelling and flow testing to British standards – to ensure accuracy, strength, and long-term performance.
We work with both traditional and flowing screeds, including laying screed over underfloor heating, and provide clear guidance before and after installation so you know exactly what to expect. With manufacturer-approved systems and a proven track record across domestic and commercial projects, our services are built on quality and attention to detail.
Want to learn more about how to lay screed over underfloor heating? Get in touch with our team today for further guidance. We’d be happy to help.
Frequently Asked Questions
How thick should screed be for underfloor heating?
The required screed thickness depends on the type of screed being used. Flowing screeds can be laid thinner due to their strength and flexibility, while traditional screeds require greater depth.
In most underfloor heating installations, flowing screed is typically laid at around 50mm.
How long to dry screed before walking/laying floor?
Screed drying time depends on thickness and type. Flowing screeds are usually walkable after 24–48 hours, but full curing can take 7–28 days. Traditional screeds may take longer.
What are some common mistakes in floor screed preparation?
Common mistakes include:
• Poor subfloor cleaning or levelling
• Incorrect insulation or membrane installation
• Heating pipes are not properly secured
• Joints and edges left unprepared
• Pouring screed too quickly or unevenly
• Not allowing adequate drying or curing time
These errors can cause cracking, uneven floors, or reduced heating efficiency.